TABLE OF CONTENTS
- How do I get started?
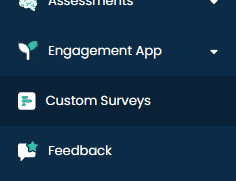
- 2. Adding Questions to Survey
- 3. Survey Requirements (Optional)
- 4 . Available Actions
- 5. Locking Mechanism
- 6. View Surveys Based on the Status
- 7. Shortcut Features
- 8. Assign Surveys to Patients
- 9. Bulk Scheduling of Surveys to Patients:
- 10.Summary of Limits
How do I get started?
Navigate to the Admin settings.
Access the Partner Account section.
Enable the Custom Survey Builder option to activate the functionality for accessing the custom survey builder.


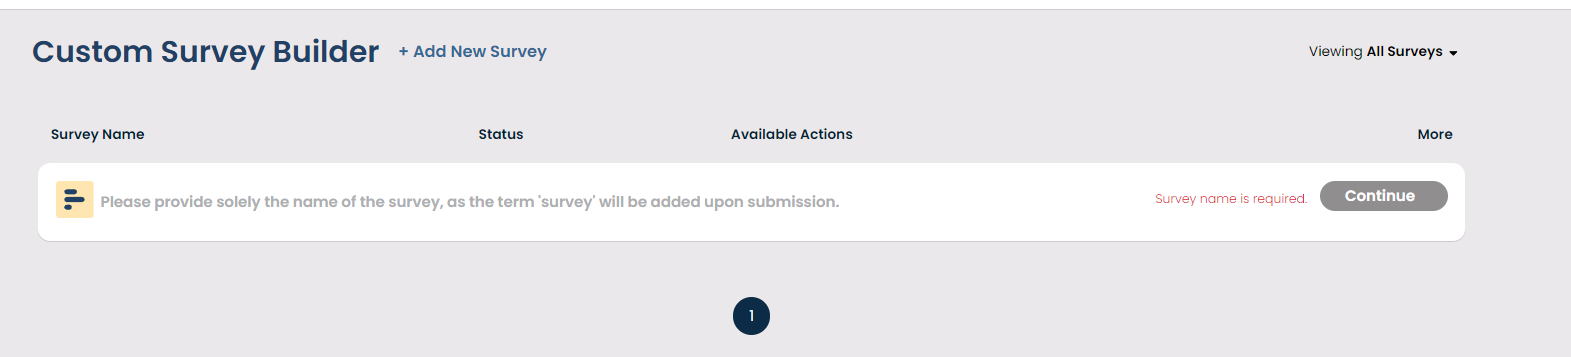
1. Welcome Screen
Upon accessing the platform, users will encounter the Welcome Screen, where they'll find an option to initiate a new survey. This option can be accessed by clicking on the "Add New Survey" row. Additionally, users will be able to view any existing surveys that were previously added on this welcome screen.

Important Points to Remember:
1. Survey Name:
- Survey name cannot be left empty and must be filled before proceeding.
- Ensure that the survey name is unique and does not match any existing survey names.
2. Automatic Naming:
- When clicking on "Continue" in the survey builder, the system will automatically append "survey" at the end of the survey name to prevent confusion and ensure clarity in survey identification.

2. Adding Questions to Survey
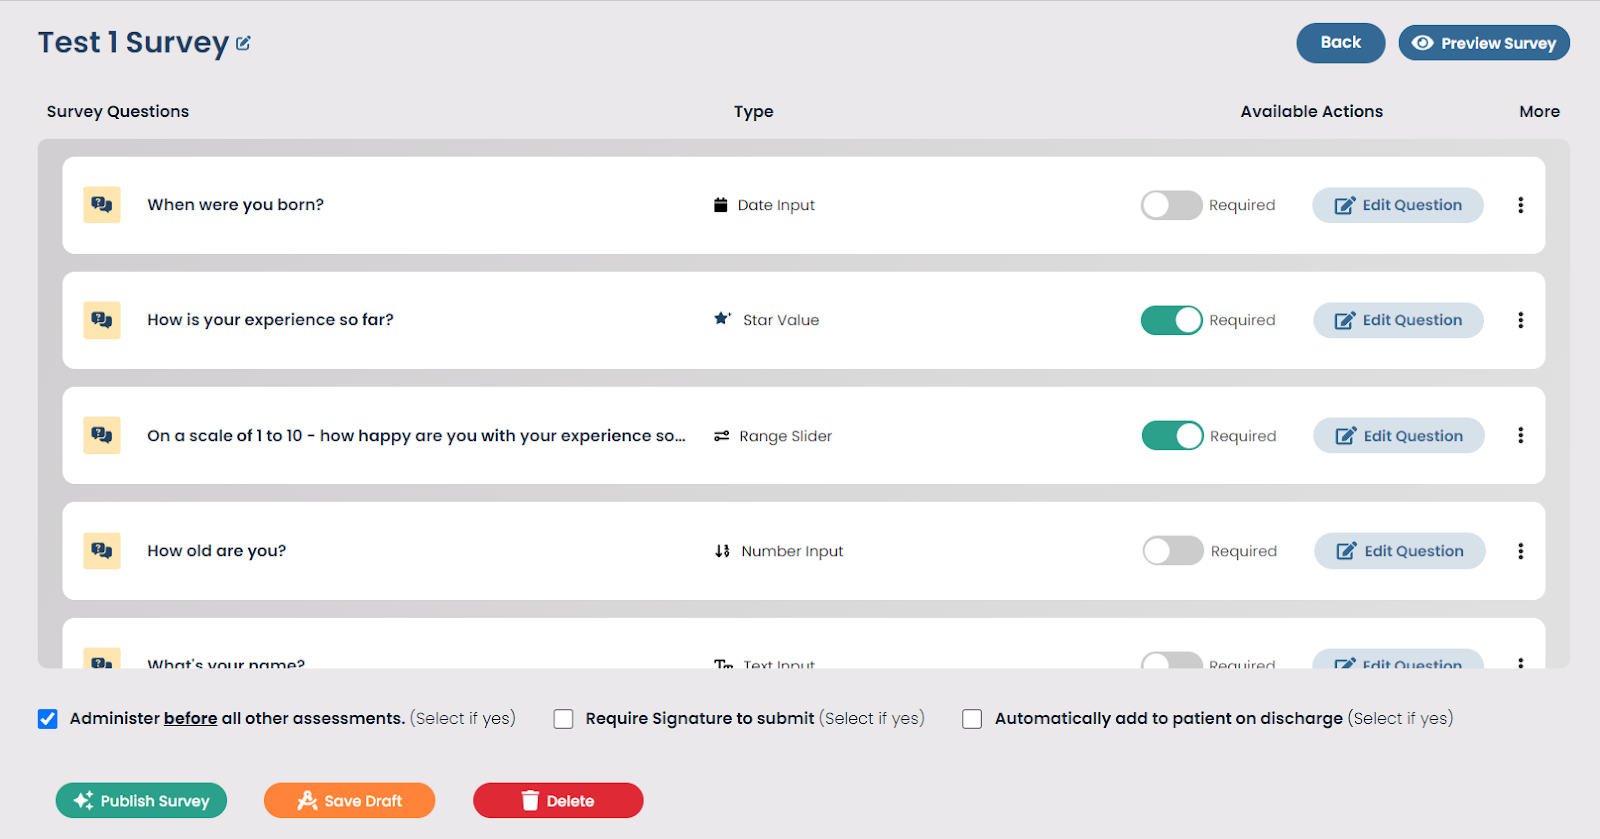
1. Upon accessing the questions screen, you will notice that the buttons for publishing the survey, saving as a draft, and previewing the survey are disabled initially.
2. You have the option to either delete the survey, which moves it to the trash, or save it as a draft for further editing.
3. The buttons for publishing, saving as a draft, and previewing the survey become enabled only when at least one question is added to the survey.
4. You can edit the survey name by clicking on the "Edit Survey Name" option, allowing for easy modification of the survey's title.
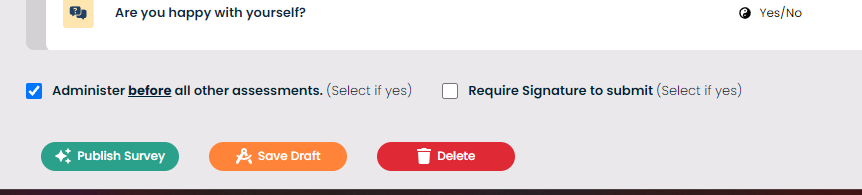
5. During survey creation, two checkboxes are available:
- "Requires Signature": Check this box if the survey necessitates a signature from participants.
- "Administer Before All Other Assessments": Check this box if the survey needs to be administered before any other assessments. If a survey is blocking, it means that the patient needs to complete the survey before continuing with their assessments.
- “Automatically add to patients on discharge”: Check this box if the survey needs to be automatically allocated to patients upon their discharge. Enabling this setting ensures that the survey is seamlessly added for patients to complete as part of their discharge process.
2.1 Add Question
1. The limit for questions in the survey is set at 50. If the number of questions exceeds this limit, a popup will appear, indicating that the survey limit has been exceeded.
2. Upon clicking on "Add Question," the question editor screen opens up, prompting the user to choose a question format. It's important to note that the question format must be selected first before adding questions.
3. After selecting the question format, a field is provided to enter the question.
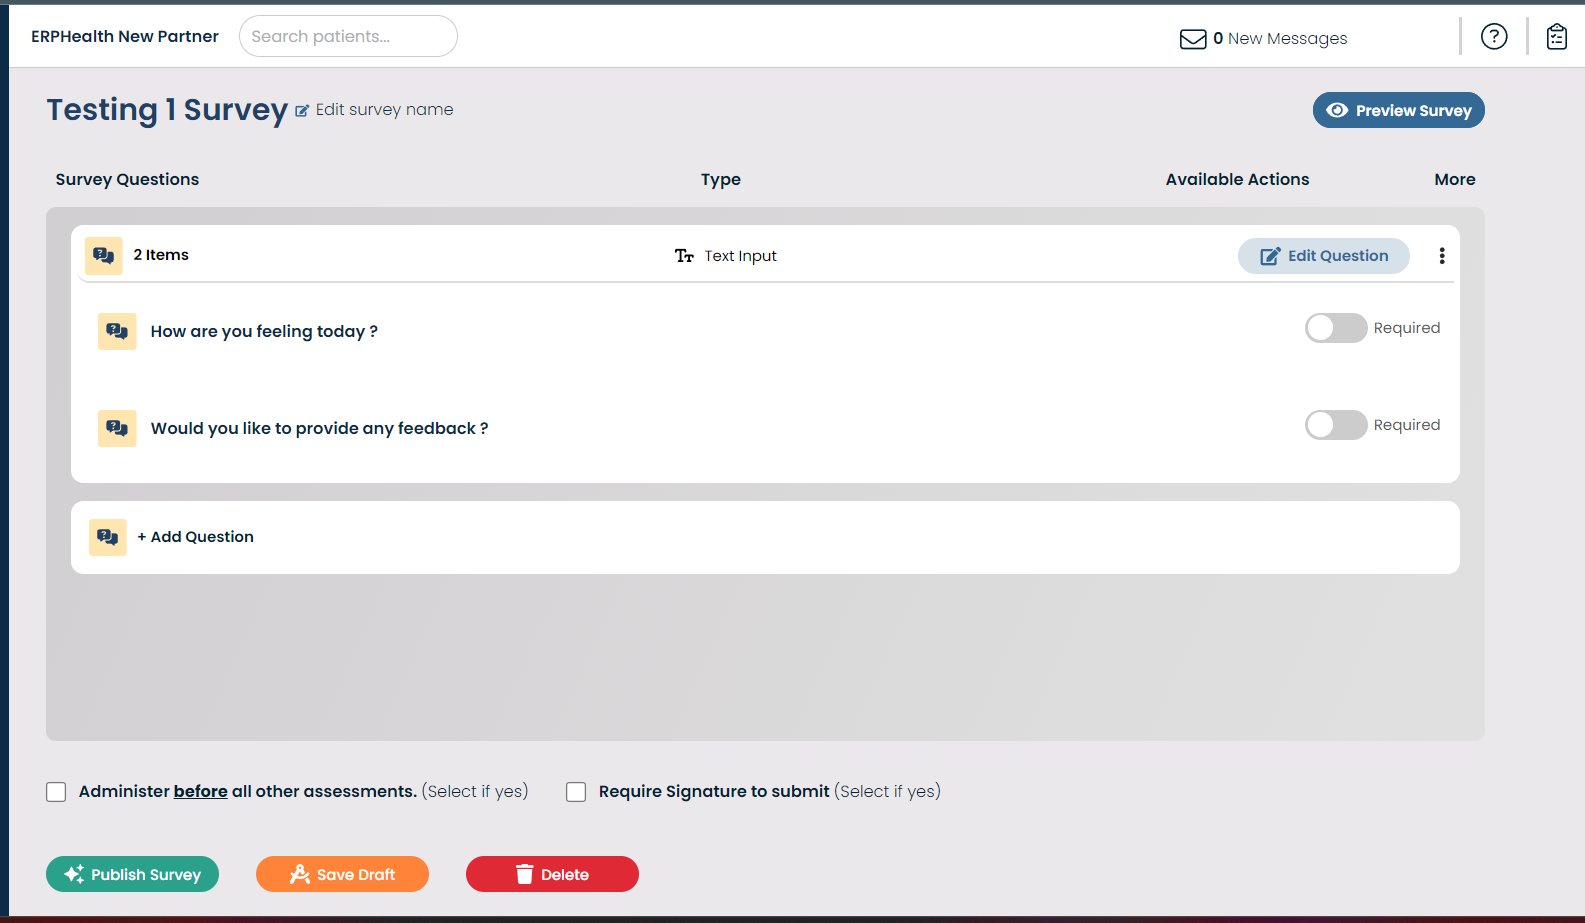
4. Additionally, users have the option to add question prompts. Question prompts allow the same options to be used across multiple questions while saving each question separately. This feature helps in avoiding the repetition of the same options for different questions.
2.1.1 Question Editor
1. In the question editor, it's necessary to choose a Question Format before proceeding to add the question prompts. This ensures an organized and sequential creation process.
2. Each question includes an option to toggle whether it is required or not. This allows users to specify whether participants must answer the question or if it's optional.
3. If a question prompt is added unnecessarily, or needs to be removed, users can easily delete it from the question editor interface. This ensures flexibility and control over the survey's content.

You can click on Back to Survey located up in the top right corner if you don't want to save the question and click on save if you want to save the question.
After saving the necessary question details and question prompts, the following screen appears:
This screen provides users with following options to manage the survey:
1. Preview Survey: Users can preview the added questions to ensure they are displayed correctly and formatted as intended.
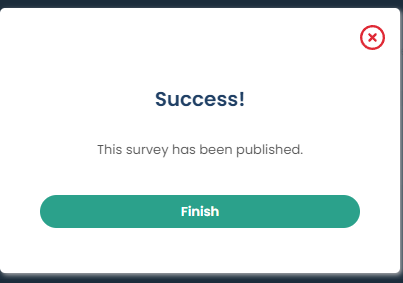
2. Publish Survey: Users can choose to publish the survey, making it available for participants to access and respond to.
3. Draft Survey: Alternatively, users can save the survey as a draft, allowing them to continue editing it at a later time before publishing.
4. Delete: Users can trash the survey if no longer needed by clicking on Delete.
Additionally, users may have the option to make further modifications to the survey's structure, such as editing or deleting questions, adjusting question prompts, or modifying question requirements, before finalizing their decision to publish or save as a draft.
2.1.1.1 Drag and Drop Questions
Questions can be organized by dragging and dropping the question containers according to the desired sequence for saving. Simply hold and press the added question, then move it to the desired position or order of your choosing.
2.1.2 Option Types
The survey builder supports the following option types for creating questions:
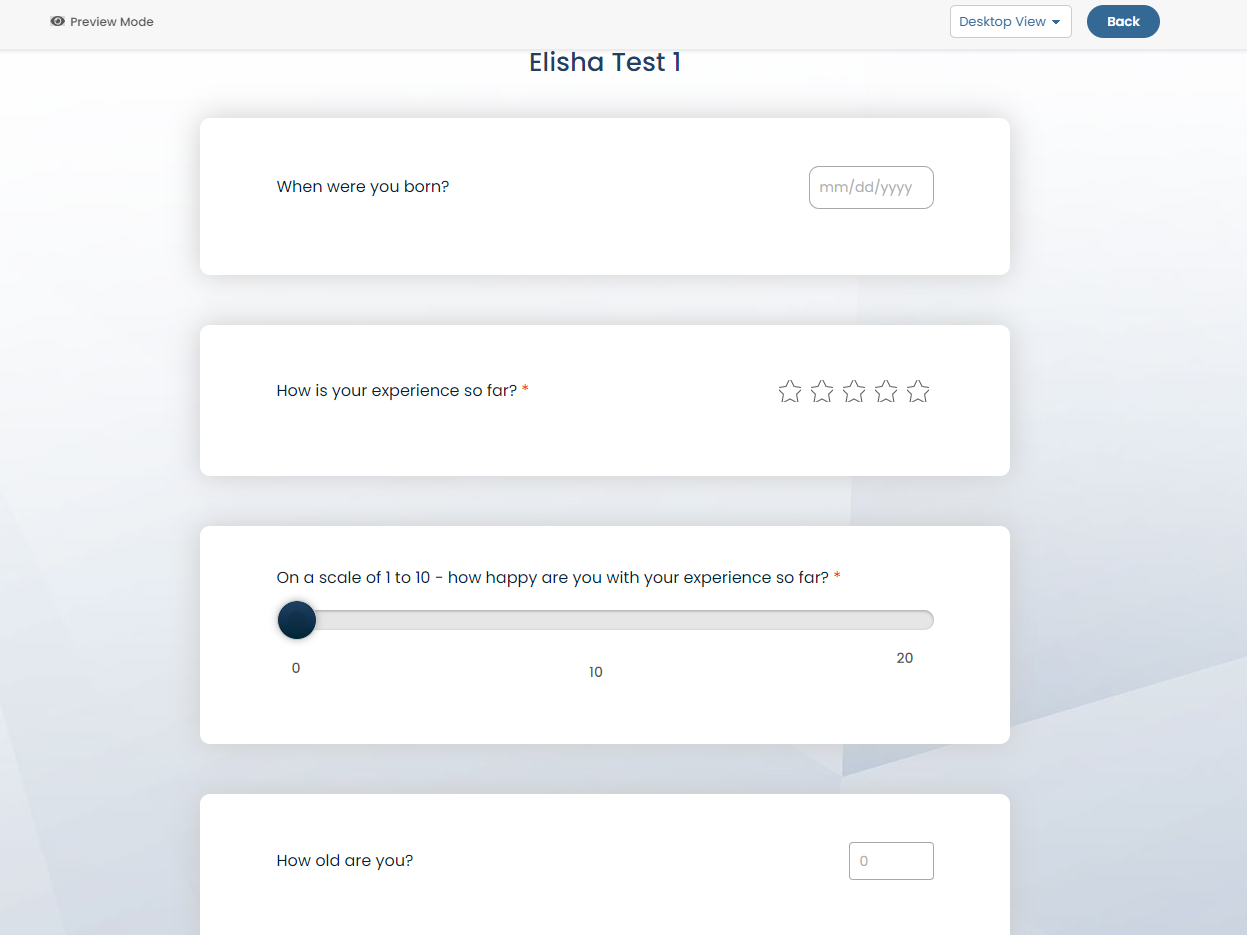
1. Text Input: Patients can enter text freely, with the option for users to set a character limit up to a maximum of 255 characters.
2. Date Input: Allows participants to select dates from a calendar.
3. Number Input: Allows participants to input numerical values.
4. Multiple Choice (Single Select): Participants can select only one option from a list of choices. Maximum number of options that can be added to the respective question type is 10.
5. Multiple Choice (Multiple Select): Participants can select multiple options from a list of choices. Maximum number of options that can be added to the respective question type is 10.
6. Yes/No Select: Participants can choose between "Yes" or "No."
7. Dropdown Selection: Participants can select one option from a dropdown menu. Maximum number of options that can be added to the respective question type is 15.
8. Range Selection (Slider): Participants can select a value within a predefined range using a slider.
9. Star Selection: Participants can rate or select options using a star rating system.
Preview of the Option Types in Question Editor:
Users can click on the Preview Survey button on the right top corner to see how different options are visible to users.

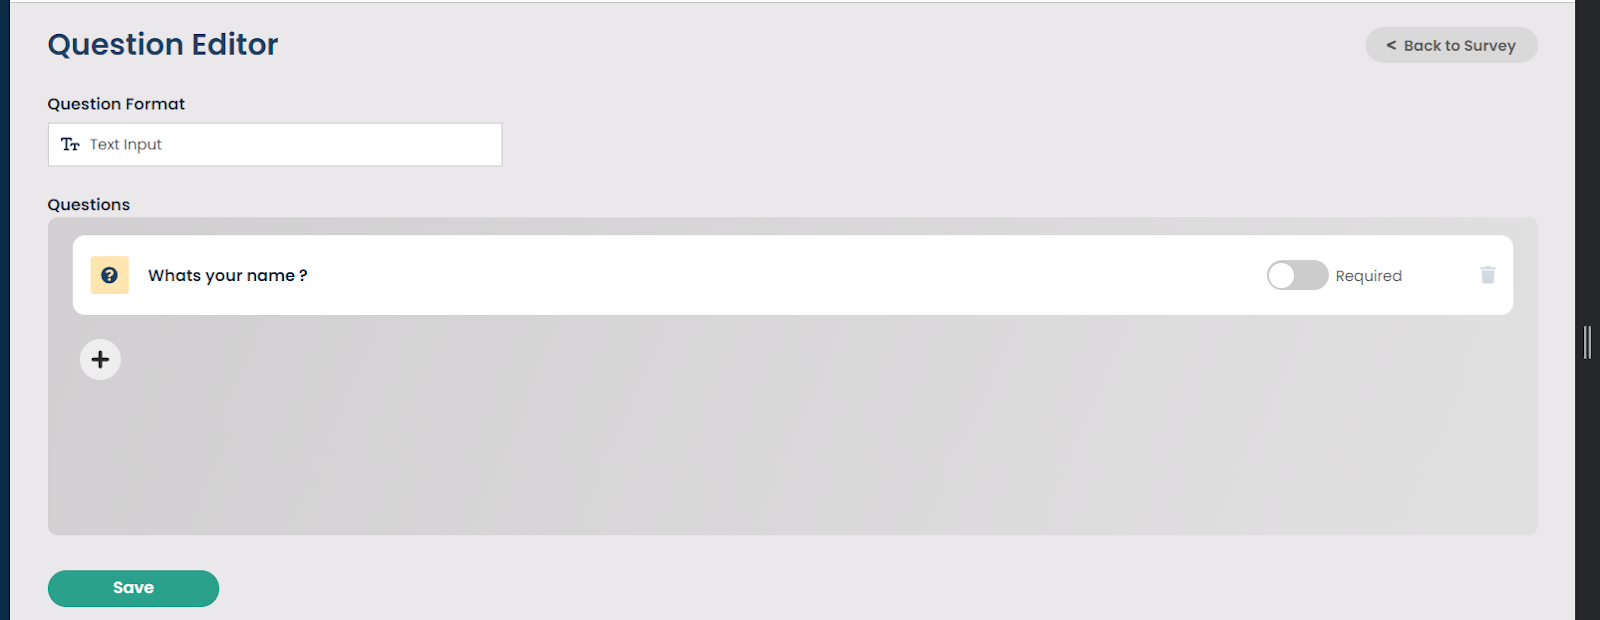
Text Input
Users can add Question prompts to the Text Question Format by clicking on the + icon.
Patients can enter text freely with a character restriction of up to 255 characters.
Number Input
To add prompts for number input, simply click on the "+" icon. Users can then specify the minimum and maximum range in the Number Range fields. This feature enables patients to input numerical values within the specified range, with the minimum value starting from zero.

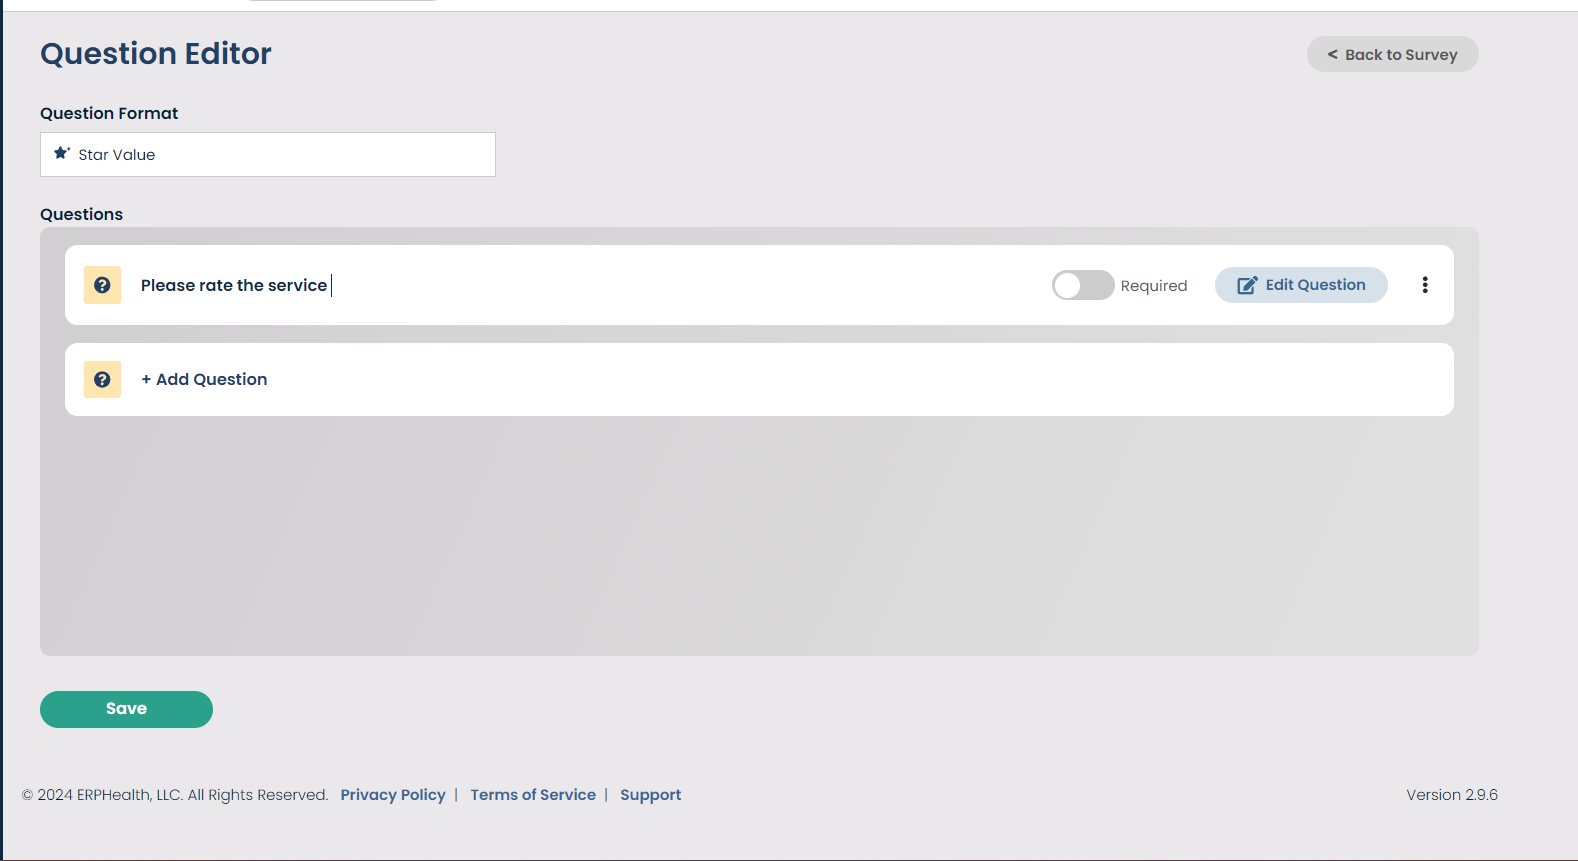
Star Input
To include prompts for star input, click the "+" icon. When star input questions are added, they come with a default of five stars, allowing patients to rate from a display of five stars.
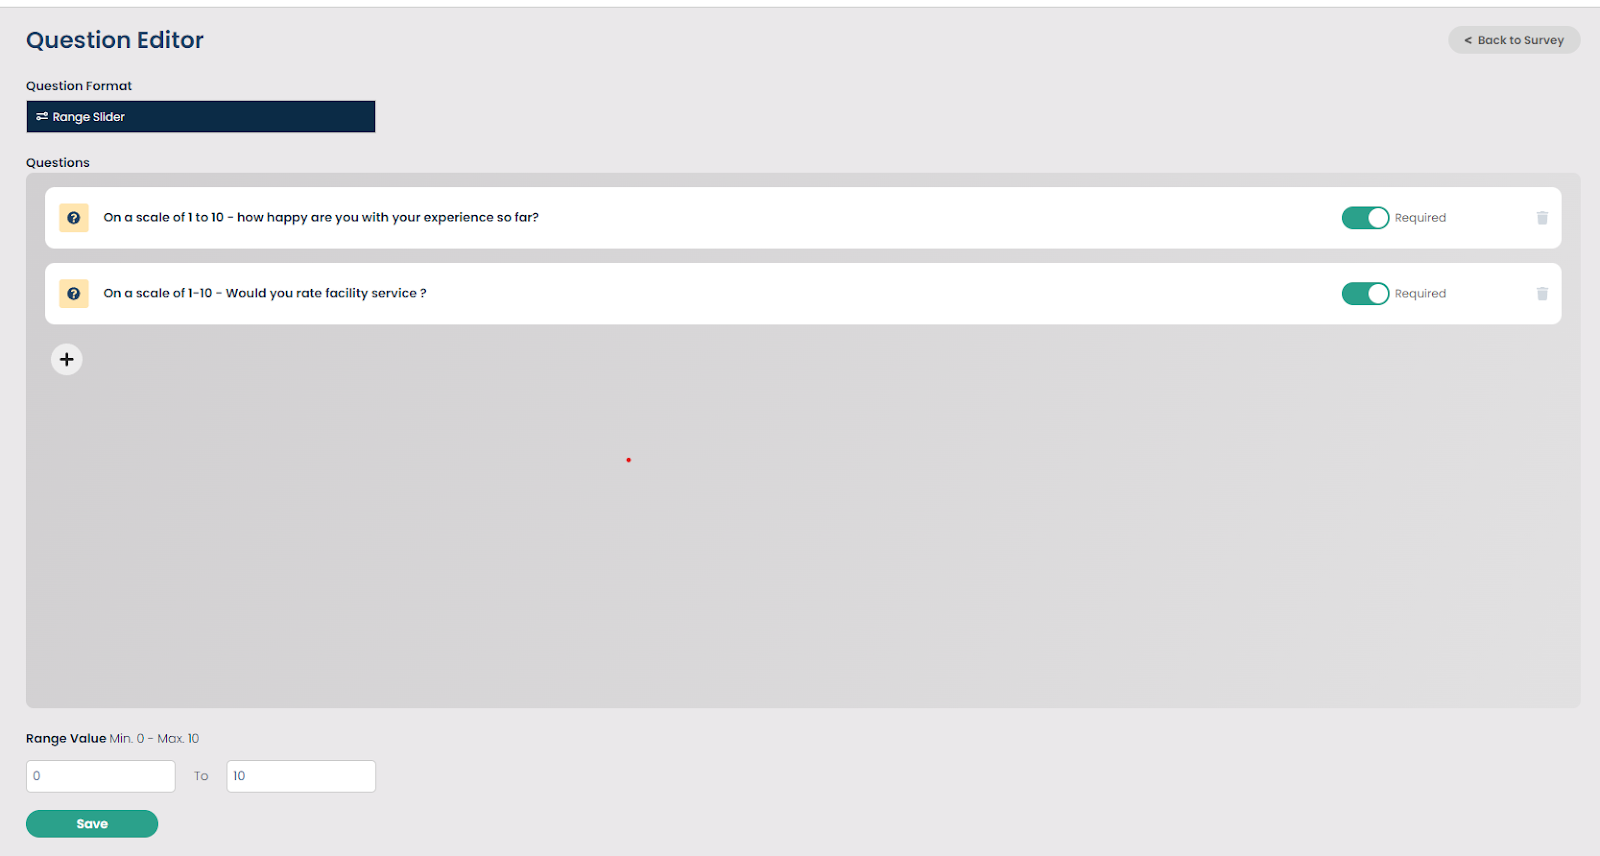
Range Slider Input
To include prompts for range input, click the "+" icon. Users can set values between the minimum (0) and maximum (10) in the range fields. This functionality allows patients to select values within this range using a slider, where the minimum starts from zero and the maximum reaches 10.
Multiple Choice (Single Selection)
This option type enables users to select a single value from a list of options. To add options and question prompts, click the "+" icon, allowing a maximum of 10 options/answers.

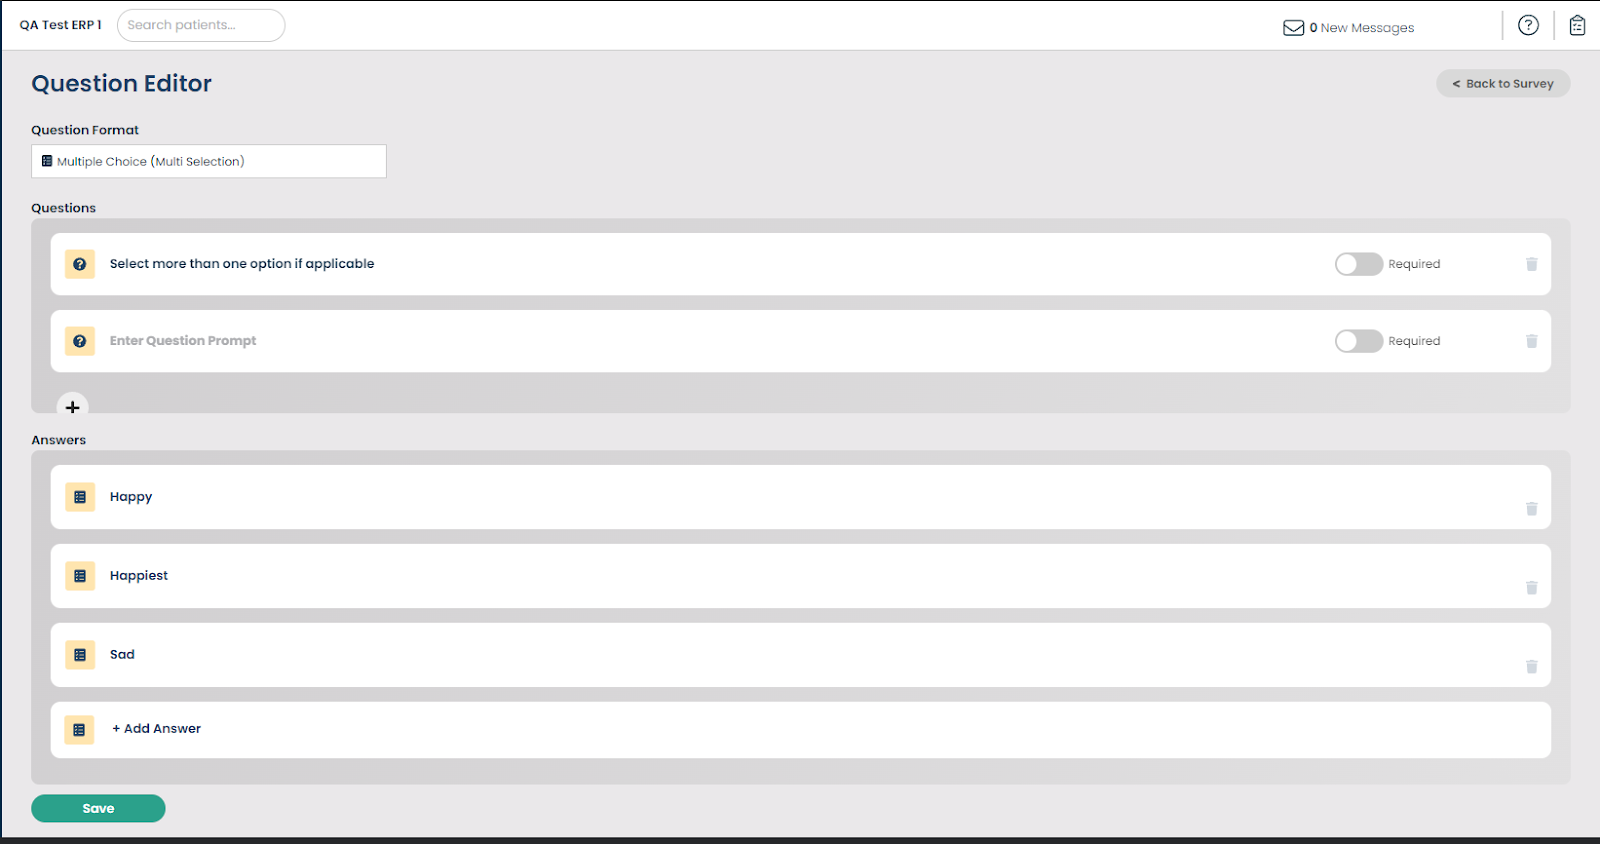
Multiple Choice (Multiple Selection)
This option type enables users to select a multiple value from a list of options. To add options and question prompts, click the "+" icon, allowing a maximum of 10 options/answers
Dropdown
This option type enables users to select a value from a list of dropdown options. To add options and question prompts, click the "+" icon, allowing a maximum of 15 options/answers

Yes/No
This option type enables users to select a value from “Yes” or “No” options. To add question prompts, click the "+" icon.

Date Input
This option type enables users to select a date from the calendar. To add question prompts, click the "+" icon.

2.2 Buttons Explained
Preview Button in Question Editor
The Preview Survey button is enabled once the user adds in questions. The survey can be viewed by clicking on Preview Survey to see how it actually looks.

Publish, Draft, and Delete
Once questions are added, the Preview Survey button becomes active. Users can click on it to view how the survey appears in actuality.
Publish Survey: After publishing, the survey's initial version is saved as 1 and can be scheduled on the patient's profile.
Save Draft: If the survey is drafted, it can be edited later before publishing.
Delete: Added surveys can be deleted. They will be moved to the trash filter and can be restored or moved to drafts as needed.

3. Survey Requirements (Optional)
Before publishing or drafting a survey, users have the option to include additional checkboxes if necessary. These checkboxes allow users to:
3.1. "Administer before all other assessments": When selected, this checkbox ensures that the survey appears before all other assessments for a user. Patients must complete the survey before proceeding to assessments.
3.2. "Require signature": When selected, this checkbox adds a signature field to the survey.
4 . Available Actions
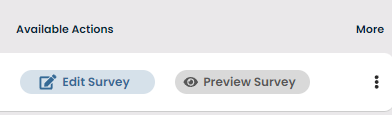
4.1 Edit Survey
Users have the option to edit existing surveys to modify questions or add new ones.
Points to Remember:
- Edit Survey Name: Editing the survey name is restricted to the Account Manager once the survey is published. However, if the survey is in draft status, users with appropriate permissions can edit the survey name.
- Edit Question: You can edit a question by clicking on edit question.
4.2 Preview Survey
All users can preview the survey to see how it appears to respondents. Users can switch between Desktop View and Mobile View using the dropdown menu located at the top of the screen.
Desktop View:
Mobile View:

4.3 Versioning
Versioning is implemented in the following manner:
- Each time a survey is published, the version number automatically increments.
- When a published survey is moved back to draft status, the version number remains the same as the previous one.
- Only when a survey is published does the version number change, reflecting the updates made to the survey.
5. Locking Mechanism
To prevent conflicts, users cannot edit a form while another user is already editing it. The lock is automatically released after 15 minutes of user inactivity, upon navigating to a different page, or upon closing the browser.
6. View Surveys Based on the Status
You can filter surveys based on their status using the view dropdown menu. Trashed surveys are only accessible through this filter as they are not displayed on the main screen.
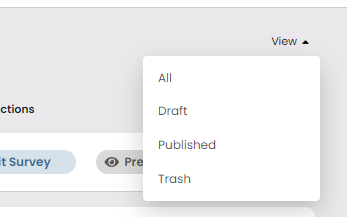
Trashed Surveys:
Surveys placed in the Trash can be restored to the Draft status.
7. Shortcut Features
They can be accessed by clicking on “More”.
Users accessing the main welcome screen can quickly perform the following actions on surveys:

- Publish Survey from Draft: Convert a drafted survey into a published one directly.
- Move Published Survey to Draft: Revert a published survey back to Draft status.
- Move Survey to Trash: Dispose of unwanted surveys by moving them to the Trash.
- Set Survey to Draft: Adjust the status of a survey, whether published or in Trash, back to Draft mode conveniently.
8. Assign Surveys to Patients
To assign surveys, follow these steps:
1. Navigate to the patient's profile.
2. Click on the profile and select “+ Add New”.

You'll find a list of published surveys under 'Custom Surveys'. Click on the survey that you would like to assign.

There are two types of surveys: administered and non-administered. Administered surveys are given before assessments, while non-administered surveys are given afterward.
You can view completed surveys under Completed Assessments & Clinical Form in the patient’s profile.
9. Bulk Scheduling of Surveys to Patients:
With this functionality, a survey can be assigned to multiple patients within a specific facility. For example, if all patients at a facility named "xyz" are required to complete the survey, this feature allows for the assignment to all patients. This option is accessible for published surveys under the available actions on the main screen.

Click on Add to Patients. There are three criteria to be considered:
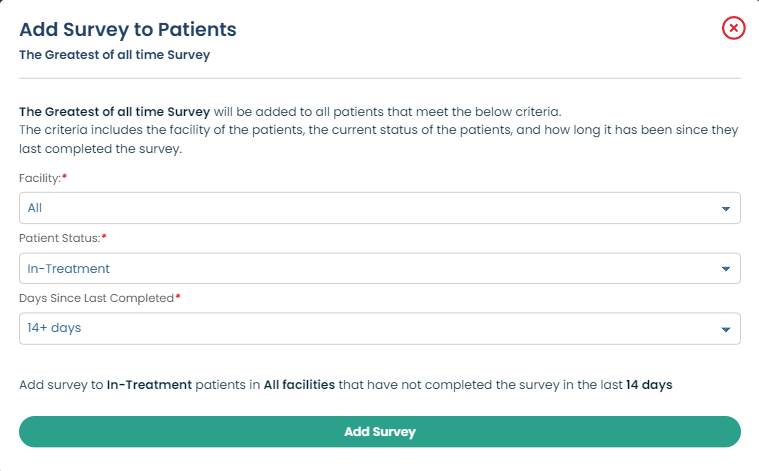
1. Facility Selection: Users must choose the relevant facility.
2. Patient Status: Determine which patients (e.g., in-treatment or post-treatment) should be assigned the survey.
3. Days Since Last Completion: The survey is assigned depending on the duration since its last completion. For example, if it has been over 14 days since the last survey completion, it will be assigned. Select the suitable options, then click on "Add Survey".
10.Summary of Limits
Maximum number of Questions: 50
Maximum Question Text Limit: 255 char
Minimum number of options: 2
Maximum number of Multiple Choice (Single Selection) : 10
Maximum number of Multiple Choice (Multiple Selection): 10
Maximum number of Dropdown Options : 15
Range (Slider): Maximum: 10, Minimum: 0
Number Input: Minimum: 0
Was this article helpful?
That’s Great!
Thank you for your feedback
Sorry! We couldn't be helpful
Thank you for your feedback
Feedback sent
We appreciate your effort and will try to fix the article